Webserver install - Part 2 - Hardening I. - Debian Lenny
This tutorial is part of The LAB project.
Finalizing "Basic install" and updating
Currently the system does not have an IP address, however there are some services which are not necessary.
You should check the open ports on the system:
netstat -anp | grep listen -i
You see that port 111 is open and portmap listens on it. Another unneded service is nfs-common which does not have an open port but I won't need it.
Remove unnecessary services
aptitude purge portmap nfs-common mlocate laptop-detectDisable inet autostart. All lines has to be commented out in the /etc/inetd.conf (will be done later)
update-rc.d -f inetd removeOr if you have already commented out everything you can simply run the following script:
if [ `egrep -v '^(#|[[:space:]]|$)' /etc/inetd.conf | wc -l` -eq 0 ] ; then echo "Disabling inetd"; update-rc.d -f inetd remove; fi
Change the /etc/inetd.conf file permissions:
chmod 0600 /etc/inetd.conf
Remove unnecessary users
Debian is shipped with some built in users which are not required for the server. Some of them are really unnecessary and some of them are not necessary at this phase. I could not find a comprehensive description accoriding to the user cleanup so I decided on my own.
The following users are not required for sure and I remove them permanently with the userdel command.
userdel games
userdel news
userdel irc
userdel list
The following users may be needed later but now I do not use them, so I comment them out. It is almost the same as I removed them. To do this comment them out in the /etc/passwd file and if you want you can do that also in the /etc/shadow:
nano /etc/passwd
Put a "#" before the following users:
bin, sys, sync, lp, proxy, backup, gnats
The following users a required for the normal operation but the do not need shell so I modify their shell to /bin/false. It means the cannot login. Only root and normal users should have the bash login, so modify all others to /bin/false:
daemon, man, mail, uucp, www-data, nobody, libuuidThe whole file looks like this in my case:
root:x:0:0:root:/root:/bin/bash
daemon:x:1:1:daemon:/usr/sbin:/bin/false
#bin:x:2:2:bin:/bin:/bin/false
#sys:x:3:3:sys:/dev:/bin/false
#sync:x:4:65534:sync:/bin:/bin/sync
man:x:6:12:man:/var/cache/man:/bin/false
#lp:x:7:7:lp:/var/spool/lpd:/bin/false
mail:x:8:8:mail:/var/mail:/bin/false
uucp:x:10:10:uucp:/var/spool/uucp:/bin/false
#proxy:x:13:13:proxy:/bin:/bin/false
www-data:x:33:33:www-data:/var/www:/bin/false
#backup:x:34:34:backup:/var/backups:/bin/sh
#gnats:x:41:41:Gnats Bug-Reporting System (admin):/var/lib/gnats:/bin/false
nobody:x:65534:65534:nobody:/nonexistent:/bin/false
libuuid:x:100:101::/var/lib/libuuid:/bin/false
Debian-exim:x:101:103::/var/spool/exim4:/bin/false
statd:x:102:65534::/var/lib/nfs:/bin/false
user:x:1000:1000:user,,,:/home/user:/bin/bash
sshd:x:103:65534::/var/run/sshd:/usr/sbin/nologin
Remove unnecessary groups
Edit the /etc/group file and comment out the users which are not necessary:
root:x:0:
daemon:x:1:
#bin:x:2:
#sys:x:3:
adm:x:4:
tty:x:5:
disk:x:6:
#lp:x:7:
mail:x:8:
uucp:x:10:
man:x:12:
#proxy:x:13:
kmem:x:15:
#dialout:x:20:user
#fax:x:21:
#voice:x:22:
cdrom:x:24:user
floppy:x:25:user
#tape:x:26:
sudo:x:27:
audio:x:29:user
#dip:x:30:
www-data:x:33:
#backup:x:34:
#operator:x:37:
src:x:40:
#gnats:x:41:
shadow:x:42:
utmp:x:43:
video:x:44:user
sasl:x:45:
plugdev:x:46:user
staff:x:50:
users:x:100:
nogroup:x:65534:
libuuid:x:101:
crontab:x:102:
Debian-exim:x:103:
#mlocate:x:104:
ssh:x:105:
user:x:1000:
ntp:x:106:
wheel:x:107:user,root
Save the file and exit.
Harden the home dirs
The home directories of users must be restricted to users group. Remove all permissions from others. This has to be done to all users (now we have only 1 called "user")
chmod -R o-rwx /home/user
Configure hostname
Set the hostname you will use for the server in /etc/hostname
nano /etc/hostname
Enter the FQDN name of your server, save the file and exit. I put the followings in it:
debsrv.localdomain
To make the change effective do the following:
hostname -F /etc/hostname
To make change the hostname in /etc/hosts:
nano /etc/hosts
Modify the names to the FQDN names and add a line with your IP address. My ip is 20.0.0.10 so mine looks like this:
127.0.0.1       localhost
127.0.1.1       debsrv.localdomain debsrv
20.0.0.10       debsrv.localdomain debsrv
Speed up Exim startup
To speed up exim4 startup edit the /etc/exim4/update-exim4.conf.conf file and put dc_minimaldns='true' in it:
nano /etc/exim4/update-exim4.conf.conf
Modify the dc_minimaldns='false' value to true:
dc_minimaldns='true'
Run the following to make the changes effective:
update-exim4.conf
Configure network
There are no network cards configured yet, so here is the way it should be set up.
My IP address will be 20.0.0.10/255.255.255.0 with the gateway 20.0.0.100 on my network card "eth0".
Configure the network interfaces according to your settings:
nano /etc/network/interfaces
It should look something like this with your addresses:
auto lo
iface lo inet loopback

auto eth0
iface eth0 inet static
 address 20.0.0.10
 netmask 255.255.255.0
 network 20.0.0.0
 broadcast 20.0.0.255
 gateway 20.0.0.100
Save the file and exit.
Configure name resolution
The name resolution can be set in the /etc/resolv.conf file.
In my case the DNS resolution can be done with my physical router's IP address which is 192.168.22.1.
nano /etc/resolv.conf
Copy the followings into the file:
domain localdomain
search localdomain
nameserver 192.168.22.1
Create temporary basic firewall rules for the time of update
This step could be ignored if you are not paranoid and you are still behind a firewall on your secured network.
Create a basic firewall script:
nano iptables_basic.sh Copy the followings inside the file:
#!/bin/bash
IPTABLES=/sbin/iptables
UPDIP=security.debian.org #check this IP before running
UPD2IP=ftp.hu.debian.org #standard packages
$IPTABLES -F
$IPTABLES -A INPUT -m state --state INVALID -j DROP
$IPTABLES -A INPUT -m state --state ESTABLISHED,RELATED -j ACCEPT
$IPTABLES -A INPUT -p tcp --dport 22 -m state --state NEW -j ACCEPT
$IPTABLES -A INPUT -i lo -j ACCEPT
$IPTABLES -A INPUT -p icmp --icmp-type echo-request -j ACCEPT
$IPTABLES -A OUTPUT -m state --state INVALID -j DROP
$IPTABLES -A OUTPUT -m state --state ESTABLISHED,RELATED -j ACCEPT
$IPTABLES -A OUTPUT -p tcp --dport 80 -d $UPDIP -m state --state NEW -j ACCEPT

$IPTABLES -A OUTPUT -p tcp --dport 80 -d $UPD2IP -m state --state NEW -j ACCEPT
$IPTABLES -A OUTPUT -p udp --dport 53 -m state --state NEW -j ACCEPT
$IPTABLES -A OUTPUT -p tcp --dport 53 -m state --state NEW -j ACCEPT
$IPTABLES -A OUTPUT -p icmp --icmp-type echo-request -j ACCEPT
$IPTABLES -A OUTPUT -o lo -j ACCEPT
$IPTABLES -A OUTPUT ! -o lo -j LOG --log-prefix "DROP " --log-ip-options --log-tcp-options
exit
Hit "CTRL+X" and press "Enter" to save it.
Change file permissions and make the script executable:
chmod 0700 iptables_basic.sh Run the script with the following command:
./iptables_basic.sh Check that the rules are applied:
iptables -L
Enable debian repositories
To enable Debian update do the following:
nano /etc/apt/sources.list
At first comment out all lines. Than remove "#" from those lines which are the update sites (remove "-s from the lines below):
deb "http://security.debian.org/" lenny/updates main
deb-src "http://security.debian.org/" lenny/updates main
Insert the following lines with a modified URL based on your location.
deb "http://ftp.hu.debian.org/debian" lenny main
deb-src "http://ftp.hu.debian.org/debian" lenny main
Save and exit.
Start networking
The first thing is to enable network card "eth0" (notice that iptables rules are applied and they will be gone after reboot).
ifconfig eth0 up Check network card settings
ifconfig
Add default gateway manually
If you do not want to restart the computer you can add default gateway manually.
route add default gw 20.0.0.100
Install Debian Security updates
To refresh the Debian update list type:
apt-get update To install the updates type:
apt-get upgrade Accept the installation by pressing "Enter".
Remote access with SSH
Do the same update process as previously.
apt-get update apt-get upgrade aptitude install ssh openssh-server
Accept the suggested packages and press "Enter" to continue the install process.
Now the SSH server is running and you can login from the network with your user account or with root (which is of course not a best practice). This is very useful if you want to copy-paste configs and you do not want to type them on the console.
Securing SSH
The SSH could be a very secure remote access method but there are some settings that are required to be set for this. The main approach is to use a secure way of authentication and trust only some few users. For the authentication I will use certificate based authentication and only some specified users will be able to login.
All configurations for SSH can be found in /etc/ssh/sshd_config. Edit the file:
nano /etc/ssh/sshd_config
The following settings should be set.
The default port should be changed just to avoid script kiddies. Who wants to find the SSH port will find it for sure. Don't forget that the iptables firewall will block requests according the current ruleset. I will use 5555 for the SSH later now I leave it on 22:
Port 22There are only one interface in the machine so I don't care about ListenAddress however you should set this if you want to restrict the SSH daemon to a specified interface cards IP address.
#ListenAddress 0.0.0.0Nowadays only protocol 2 is meant to be secure so force this:
Protocol 2
Hostkey algorithms should be set like this:
HostKey /etc/ssh/ssh_host_rsa_key
HostKey /etc/ssh/ssh_host_dsa_key
UsePrivilegeSeparation specifies whether sshd separates privileges by creating an unprivileged child process to deal with incoming network traffic. After successful authentication, another process will be created that has the privilege of the authenticated user. The goal of privilege separation is to prevent privilege escalation by containing any corruption within the unprivileged processes. Set this to yes.
UsePrivilegeSeparation yesThe "KeyRegenerationInterval 3600" and "ServerKeyBits 768" values are not important because they are related to Protocol 1 which is disabled in my case.
The default logging level is suitable for now:
SyslogFacility AUTH
LogLevel INFO
The server disconnects after the time specified if the user has not successfully logged in. The value should be set less than the default because it wastes resources unnecessary.
LoginGraceTime 20Root login should be disabled via SSH. One can login with a regular username and use sudo to run root level programs.
PermitRootLogin no
Set the authorized keys location (this is default by the way)
AuthorizedKeysFile %h/.ssh/authorized_keys
To restrict SSH to a few users the AllowUsers should be set followed by the list of users allowed to login. In my case only "user" will be able to login, more users can be added after this separated by space.
AllowUsers user
The StrictModes specifies whether sshd should check file modes and ownership of the user's files and home directory before accepting login.
StrictModes yesThe best practice is to disable simple password authentication and only use certificate based authentication. The following two settings enables the feature to use public-key authentication with certificates.
RSAAuthentication yes
PubkeyAuthentication yes
PasswordAuthentication is set to yes by default and you should leave this as is before trying out the certificate based authentication if you do not want to lock yourself out of the system.
PasswordAuthentication yesEmpty password should not be used, the default is ok for.
PermitEmptyPasswords no
X11 forwarding should be disabled because we don't need it.
X11Forwarding no
A banner should be printed when someone logs into the system. PrintMotd specifies whether sshd should print /etc/motd when a user logs in interactively. You should edit the /etc/motd to customize the message.
PrintMotd yes
I like to see the date and time of the last user login when a user logs in interactively, so I leave this as is.
PrintLastLog yesThe TCPKeepAlive is a good feature to detect network errors and crashes so I leave it as is. This enables the system to send keep-alive messages to detect connection availability.
TCPKeepAlive yes
Generate SSH public key - private-key pairs
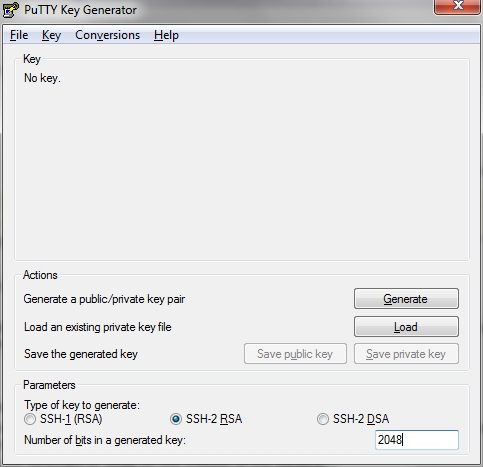
To use certification based authentication the public and private keys should be generated. I prefer using the Windows based puttygen located in the putty install directory or can be downloaded from the putty website.
Start the puttygen.exe and set the bitlength to 2048 on the bottom of the window. Press "Generate" to create the keypair. You should move the mouse randomly to generate a more random number :).
When the keygeneration finished you should set a password for the keyfile. I set a short on but you should use a password according to the best practice password policies.
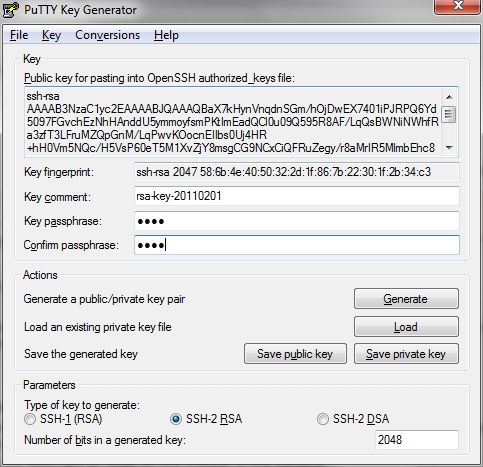
To save the keys click on Conversations and select "Export OpenSSH key". Save the public and private keys also by clicking on the buttons "Save public key" and "Save private key".
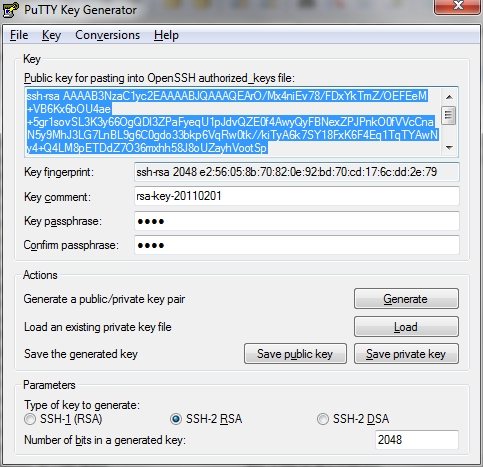
Copy the Public key and Paste it to a text file because this will be copied to the ssh server. I saved this to "deb_srv_copied.txt".
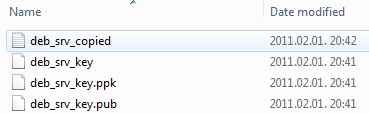
Now you should have 3 files saved somewhere on your computer.
The next step is to copy the public key from "deb_srv_copied.txt" to the Debian servers ~/.ssh/authorized_keys file. In my case this will be /user/.ssh/authorized_keys. The file should be readable by the user so I change the user for this process to the "user" user.
su - user
nano /user/.ssh/authorized_keys
Copy and paste deb_srv_key.pub files contents to the file and save it (do not copy a newline at the end of the last line). The "ssh-rsa" should be in the same line as the hash It will look something like this:
ssh-rsa AAAAB3NzaC1yc2EAAAABJQAAAQEArO/Mx4niEv78/FDxYkTmZ/OEFEeM+VB6Kx6bOU4ae+5gr1sovSL3K3y66OgQDl3ZPaFyeqU1pJdvQZE0f4AwyQyFBNexZPJPnkO0fVVcCnaN5y9MhJ3LG7LnBL9g6C0gdo33bkp6VqRw0tk//kiTyA6k7SY18FxK6F4Eq1TqTYAwNy4+Q4LM8pETDdZ7O36mxhh58J8oUZayhVootSp+wjSWsR2escRcyufiQ3r0RWmgNiZnOSzpYuDn1IPx8rmIYxfrlW0FysHih6TDf6qBw49noLy3gvDb9uJNurxDbc6UisFqwMoHvlCTo/rf/ziOtFg+eEfwhpj/M2vyCUv8RQ==
rsa-key-20110201
Make the file readable only for the user:
chmod 0600 ~/.ssh/authorized_keys
I quit from "user" environment back to root.
exitNow restart the ssh server to make the changes effective.
/etc/init.d/ssh restart
The next step is to add the private key to your putty config. You can do this at "Connection/SSH/Auth" in Putty.
The "Attempt keyboard-interactive auth" should be disabled. Private key file should be browsed with the "Browse" button. This file is the ".ppk" file.
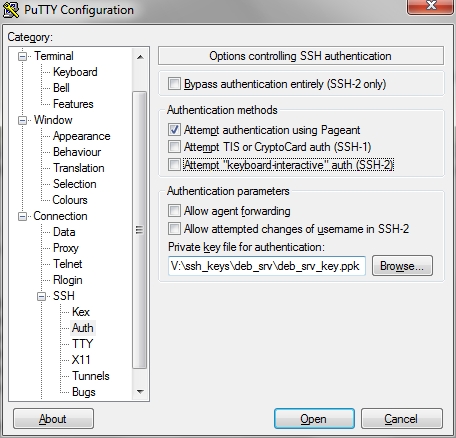
Don't forget to set the port number to the new "5555" port or whatever you set.
When connecting the putty will ask for accepting the new fingerprint. Choose "Yes" to accept. After typing the username it will ask for the password you set for the public key authorization.
If the connection was successful we can finalize the sshd_config by disabling password logins:
nano /etc/ssh/sshd_config
Set the following:
PasswordAuthentication no
Save the file and restart ssh service. DO NOT CLOSE the current putty just to be on the safe side (however we are close to the machine if we are lucky so if any bad thing happen we could login from console of course).
/etc/init.d/ssh restart
Open a NEW putty terminal and check if you can login or not:). If you can, you are finished with SSH setup. The port change will happen when the iptables is finalized.
Links:
http://www.debian.org/doc/manuals/securing-debian-howto/ch3.en.html
http://unixhelp.ed.ac.uk/CGI/man-cgi?sshd_config+5
http://www.chiark.greenend.org.uk/~sgtatham/putty/download.html
Iptables scripts: http://www.cipherdyne.org/LinuxFirewalls/
The BOOK: http://www.nostarch.com/firewalls_mr.htm
The next tutorial is: Webserver install - Part 3 - Hardening II. - Debian Lenny